
Have you ever wanted to learn how to draw a knight, perhaps a noble warrior in shining armor? Many people feel that drawing a detailed character like a knight might be a bit tricky. It’s a common thought, too, that getting all the armor and weapons just right takes a lot of skill. But honestly, it is not as hard as it seems when you have the right approach.
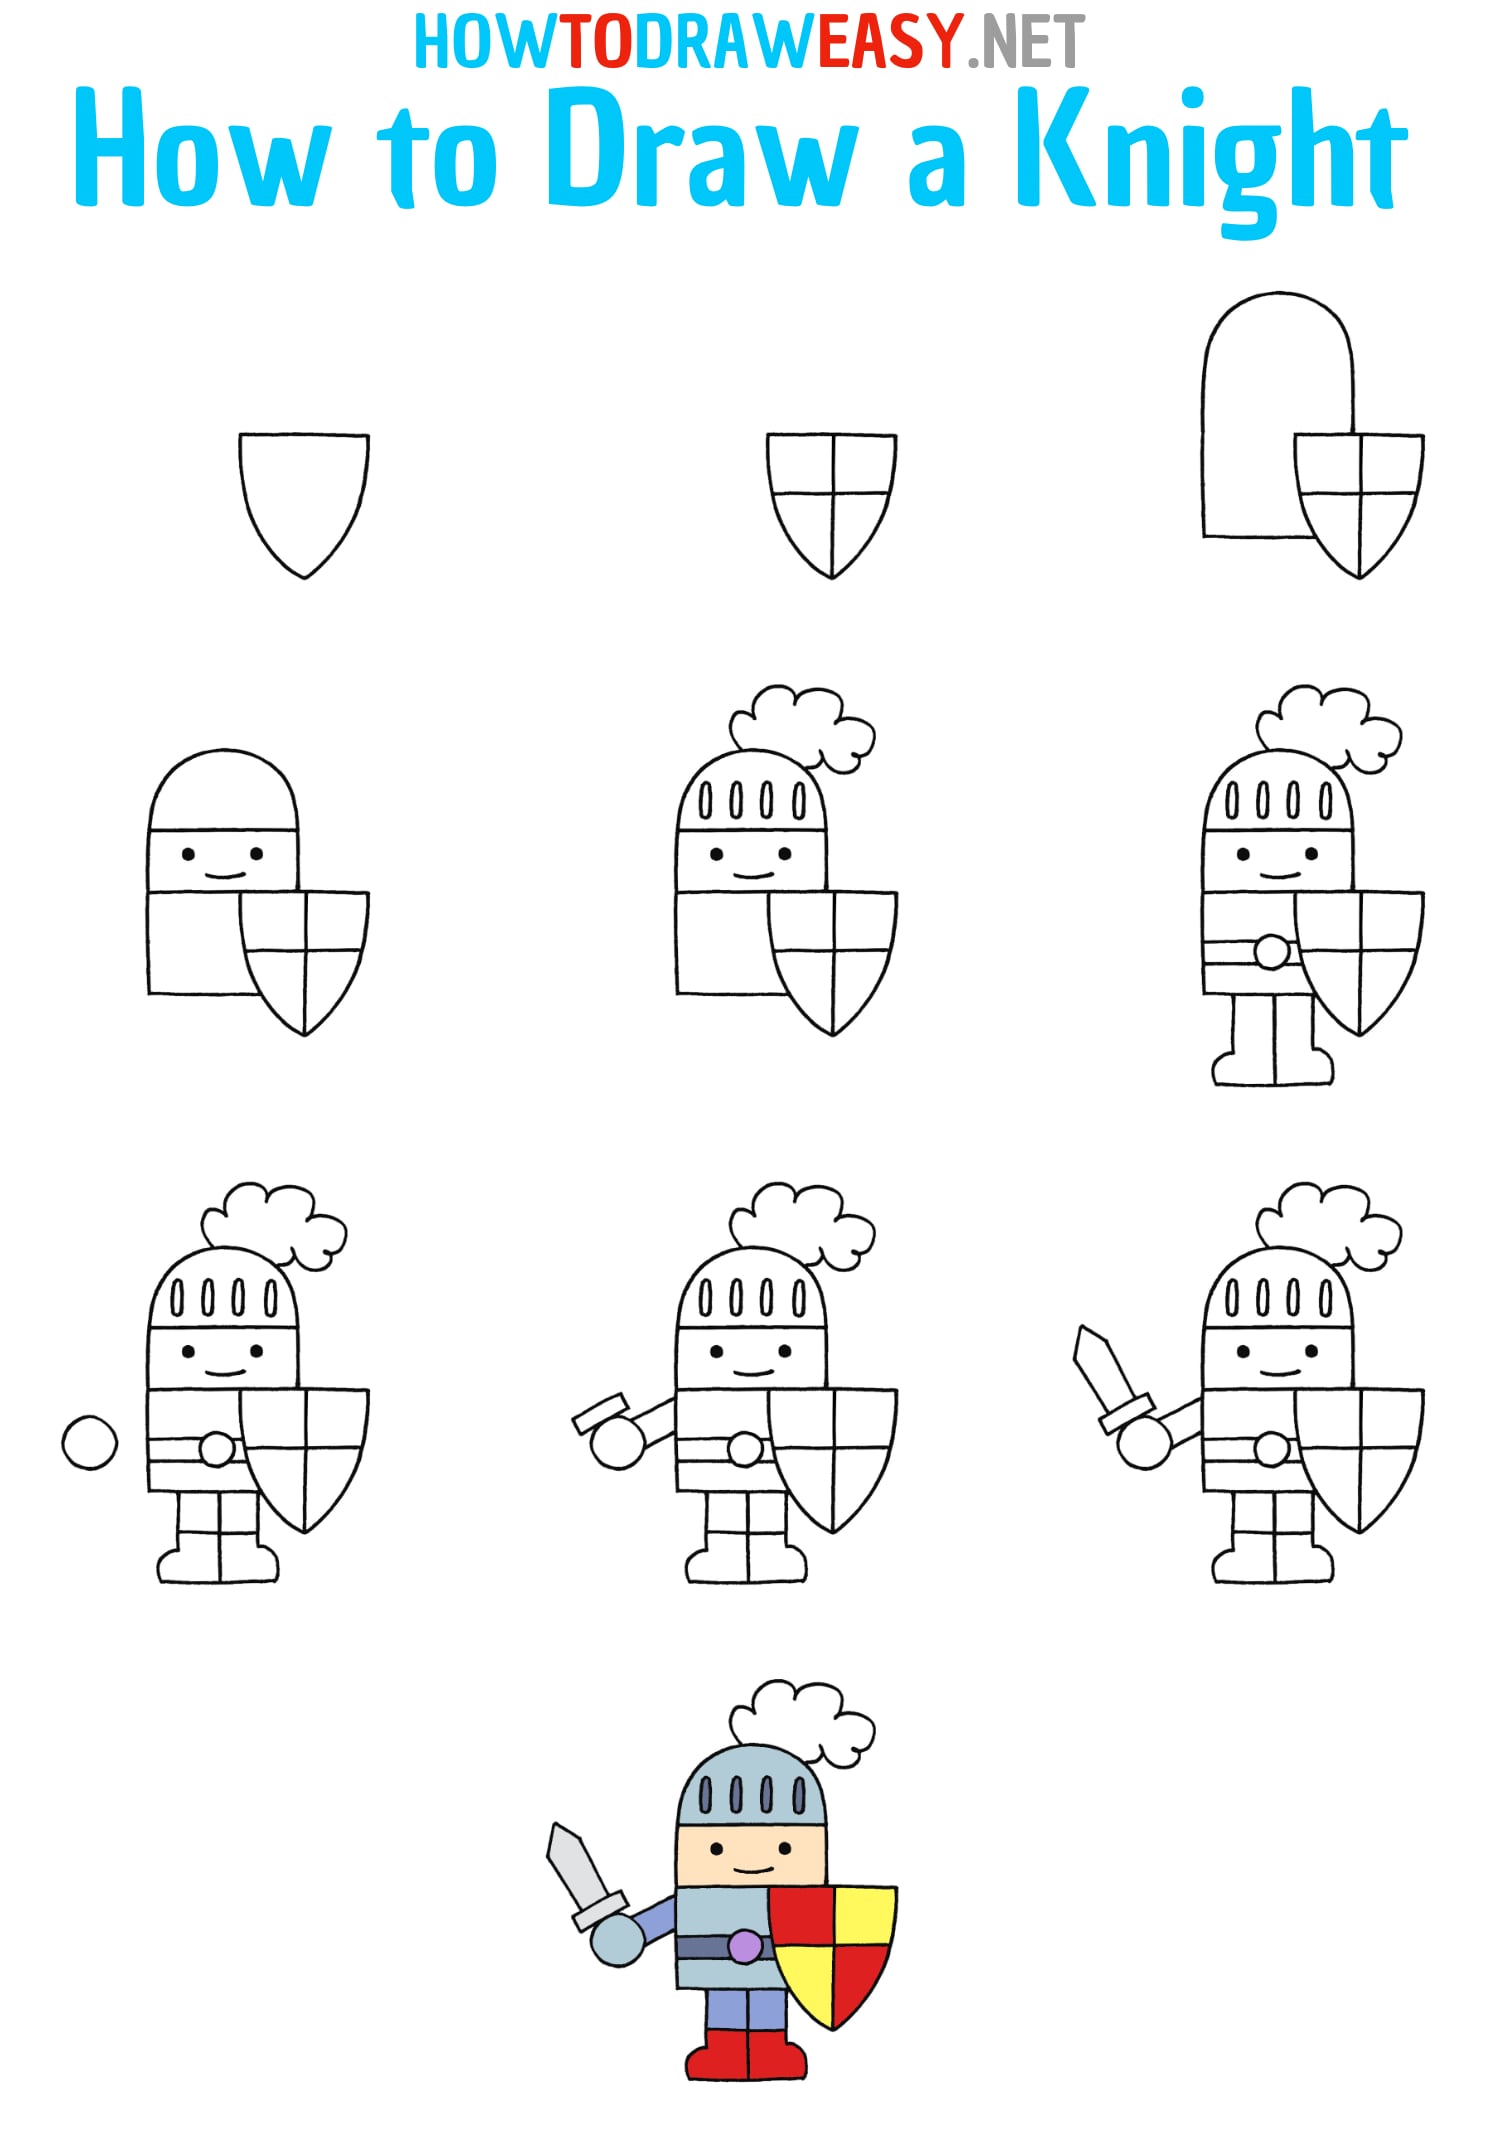
Today, you will learn how to draw a knight in just a few easy steps. We will walk through the process together, making it simple for anyone to create a majestic illustration. This guide will help you depict one of these brave figures, giving you useful drawing skills along the way, you know.
Whether you are a young artist or someone simply looking for a fun new drawing challenge, this article is for you. Your very own knight in shining armor will easily come to life with this guide. Get ready for this fun and easy journey into drawing a medieval hero, so.
Table of Contents
- Getting Started: Your Drawing Tools
- The Basics of Knight Anatomy
- Crafting the Armor: Layer by Layer
- Equipping Your Knight with Weapons and Shields
- Adding Final Touches and Details
- Frequently Asked Questions About Drawing Knights
- Your Next Drawing Adventure
Getting Started: Your Drawing Tools
To begin your drawing quest, you will need a few things. You can use traditional art supplies, like pencils and paper, of course. A good eraser is always a helpful friend, too. Alternatively, you might prefer to use a digital drawing application, like the one we offer. This can make the process quite smooth, you know.
Our free online drawing application is for all ages, apparently. It lets you create digital artwork to share online. You can even export your creations to popular image formats like JPEG, PNG, SVG, and PDF. This makes sharing your knight with friends or family very easy, by the way.
You can easily draw, edit photos, or design your next business card with it. It is rather versatile. Craft images for social media posts, digital ads, paper, or even apparel. Make a quick photo edit with the drag and drop feature, or try some of the neat shortcuts. For instance, drawing the letter “s” can take you to the style chooser, so.
While holding a button, you can tap the screen with different finger combinations. This lets you access tool presets that have been set up in the tool. It is pretty convenient for quick changes. This really helps when you are focusing on the finer details of your knight’s armor, as a matter of fact.
The Basics of Knight Anatomy
Before adding all the cool armor, it is useful to understand the basic human figure. Learn to draw the human figure first, if you have not already. This provides a solid base for placing the armor correctly. A knight is, after all, a person inside all that metal, you see.
Starting with the Head and Helmet
We are going to draw the head first, which is a good starting point for any character. Begin by drawing a simple circle. This circle will be the basic shape for the knight’s head. It does not have to be perfectly round, just a general guide, sort of.
Within that circle, make a square shape. This square will be for the helmet opening, or the visor. Think of where the knight would look out from. This opening will typically have many vertical lines for protection, so.
Around this initial head shape, you will start to build the helmet. Consider the different parts of a medieval helmet. There is often a rounded top, a visor that lifts, and pieces that protect the neck and sides of the face. It is like building a small metal house for the head, you know.
You might want to add a slight curve to the top of the helmet. This helps it look more like a protective dome. Then, extend lines down from the sides of the circle to form the helmet’s sides. These lines will connect to the body later, apparently.
Shaping the Body and Torso
Next, we will outline the body. Below the helmet, draw a basic torso shape. Think of a slightly elongated rectangle or a trapezoid for the chest and waist. This gives the knight a strong, upright posture, like your typical warrior, you know.
From the torso, draw simple lines for the arms and legs. These are just guidelines for now. They do not need to be detailed, just enough to show where the limbs will go. Remember, the armor will add a lot of bulk, so keep these initial shapes somewhat slender, just a little.
For the arms, you can draw two lines extending from the shoulders. They should bend slightly at the elbows. For the legs, draw two lines going down from the hips, with a slight bend for the knees. This basic stick figure approach helps with proportions, honestly.
Consider the pose of your knight. Is he standing tall and still, or is he perhaps ready for action? The angle of these initial lines will determine the overall feel of your drawing. A dynamic pose can make your knight look more alive, naturally.
Crafting the Armor: Layer by Layer
Now comes the fun part: adding the armor! This is where your knight truly takes shape. Armor is made of many overlapping plates, so think about how each piece fits together. It is almost like assembling a puzzle, you know.
Designing the Helmet Details
Go back to the helmet you started. Now you can add more specific details. The visor, for instance, might have small eye slits or a grill pattern. Some helmets have a distinct ridge down the middle. Others might have decorative elements, like a plume holder, so.
Think about the different types of helmets. There are great helms, bascinets, and sallets, to name a few. Each has its own look. You can choose a style that appeals to you, or even combine elements from different ones. This makes your knight unique, pretty much.
Add lines that suggest the separate plates of metal. These lines give the helmet a sense of structure and realism. Make sure the lines follow the curve of the head. This helps the helmet look like it fits properly, as a matter of fact.
The neck guard, or gorget, connects the helmet to the body armor. Draw this piece so it looks like it overlaps the chest plate. This provides continuous protection. It is a vital part of the knight’s defenses, you see.
Drawing the Pauldrons and Vambraces
Pauldrons are the large shoulder pieces. They protect the shoulders and upper arms. Draw them as rounded, overlapping plates. They should look like they can move with the knight’s arm. They are quite prominent, you know.
From the pauldrons, draw the arm protection. This includes the rerebraces for the upper arm and the vambraces for the forearm. These pieces often have a cylindrical shape. They fit around the arm, allowing for movement at the elbow, so.
The elbow joint itself is usually covered by a couter. This is a separate, often pointed, piece of armor. It provides flexibility while still protecting a vulnerable spot. Think of it as a small shield for the elbow, sort of.
For the hands, draw gauntlets. These are armored gloves. They can be very detailed, with individual finger plates or a more simplified mitten-like shape. They protect the hands, which are very important for holding weapons, obviously.
Adding the Cuirass and Faulds
The cuirass is the main body armor, covering the chest and back. Draw this as a solid, curved piece that fits over the torso. It should look strong and protective. This is the core of the knight’s defense, after all.
Below the cuirass, draw the faulds. These are overlapping horizontal plates that protect the waist and hips. They allow the knight to bend and move. They often look like a series of metal skirts, in a way.
From the faulds, the tassets might hang down. These are plates that protect the upper thighs. They add another layer of defense. They are typically attached to the faulds or the belt, apparently.
Consider adding a belt or straps around the waist. These details help to hold the armor together visually. They also add a bit of realism to the drawing. It is the little things that make a big difference, you know.
Creating the Greaves and Sabatons
For the legs, draw the cuisses for the thighs and the greaves for the shins. These are typically large, curved plates that wrap around the leg. They should look sturdy and capable of deflecting blows, pretty much.
The knee joint is protected by a poleyn. This is similar to the elbow couter, but for the knee. It is often a rounded or pointed piece that allows for bending. It is another key point of articulation, so.
Finally, for the feet, draw sabatons. These are armored shoes. They can be quite pointed or more rounded, depending on the style of armor. They complete the full suit of protection, really.
Make sure the leg armor looks like it can move. Even though it is metal, it was designed to allow the knight to walk, ride, and fight. Show this flexibility through slight overlaps and breaks in the plates, you know.
Equipping Your Knight with Weapons and Shields
A knight is rarely seen without a weapon and a shield. These items add to the character and tell a story. You can choose what kind of weapon your knight will carry, too.
The Mighty Sword
A sword is a classic choice for a knight. Draw a long, straight blade with a hilt and a pommel. The hilt is the handle, and the pommel is the rounded end. Make sure the sword looks proportionate to your knight, you know.
You can add details to the sword, like a crossguard that protects the hand. Some swords have intricate designs on the hilt. You can make your sword look very plain or very ornate, it is up to you, of course.
Consider the scabbard, which is the sheath for the sword. It might hang from the knight’s belt. This adds another element of realism. It shows how the knight carries their weapon when not in use, apparently.
Other weapons could include a lance, an axe, or a mace. Each weapon has a different feel. A lance suggests a knight on horseback, for instance. An axe might suggest a more brutal fighter, so.
The Protective Shield
A shield is another iconic piece of a knight’s gear. Draw a shield that fits the knight’s arm. Shields come in many shapes: round, kite-shaped, heater-shaped. A heater shield, shaped like an iron, is a common medieval choice, you know.
On the shield, you can draw a coat of arms or a symbol. This adds personality to your knight. It could be a lion, a cross, or a family crest. This is where you can really make your knight unique, pretty much.
Think about how the shield is held. It usually has straps on the back for the arm. Make sure the shield looks like it is actually being carried by the knight, not just floating next to them, basically.
The shield can also show signs of battle, like dents or scratches. This tells a story about your knight’s adventures. It gives them a bit of history, in a way.
Adding Final Touches and Details
Once you have the basic shapes and armor down, you can refine your drawing. Go over your lines to make them cleaner and more defined. Erase any initial sketch lines that are no longer needed, you know.
Add shading to give your knight depth and dimension. Think about where the light source is coming from. Areas facing the light will be brighter, and areas in shadow will be darker. This makes the armor look metallic and solid, so.
You can also add texture to the armor. Small lines or dots can suggest rough metal or wear and tear. This makes the drawing more interesting. It brings your knight to life, apparently.
Consider adding a background. Your knight could be standing in a castle courtyard, on a battlefield, or in a peaceful forest. A background helps to set the scene. It gives your knight a place in the world, you know.
Do not forget small details like rivets on the armor plates. These little things add a lot of realism. They show how the armor is constructed, too. It is these details that truly make your knight shine, you see.
Frequently Asked Questions About Drawing Knights
People often have questions when they are learning how to draw a knight. Here are some common ones, you know.
How do I make the armor look shiny?
To make armor look shiny, you need to use strong contrasts between light and dark areas. Add very bright highlights where the light hits directly. Then, use dark shadows in the recessed parts. This contrast creates the illusion of polished metal, pretty much.
What is the easiest way to draw a knight’s helmet?
The easiest way to draw a knight’s helmet is to start with a simple circle for the head. Then, build the helmet around it using basic geometric shapes like squares and cylinders. Focus on the main form first, then add the details like the visor and neck guard. This approach simplifies the process, you know.
Should I draw the human body first or go straight to the armor?
It is usually a good idea to draw a basic human figure or a simple stick figure first. This helps you get the proportions right and ensures the armor fits realistically on a body. The armor then drapes over this underlying structure. It is a good foundation, basically.
Your Next Drawing Adventure
You have just learned how to draw a great looking knight with easy drawing instructions. By following these simple steps, you too can easily draw a perfect knight. This tutorial for kids and adults makes it much simpler for you to depict one of these noble warriors. Start this tutorial and get useful drawing skills, you know.
You can keep practicing to make your knights even better. Try different poses, armor styles, or even add a horse! The possibilities are quite vast. Remember, practice really helps you improve your drawing abilities, apparently.
For more drawing fun, you can check out our other guides. For example, learn more about drawing fantastic creatures on our site. We have tutorials for all sorts of characters and animals. You might also like to explore how to draw a dragon, which is another popular fantasy subject, too.
Our drawing application can help you refine your skills. It offers a free online drawing application for all ages. You can create digital artwork to share online. This tool makes it easy to experiment with different colors and textures. It is a great way to keep creating, so.
So, go ahead, embark on a noble quest and learn how to draw a medieval knight with this captivating guide. Unleash your inner artist and create a gallant hero! We are here to help you every step of the way, you know.
For more drawing inspiration and resources, you might find useful tips on general drawing techniques from reputable art sites, like Art is Fun, for instance. They have many good articles for beginners, too.


Detail Author:
- Name : Dr. Edmond Veum
- Username : uschmidt
- Email : barney80@yahoo.com
- Birthdate : 1992-01-08
- Address : 440 Shanahan Extension Apt. 410 East Olaf, MA 22764-7456
- Phone : (628) 559-8093
- Company : Kris-Towne
- Job : Court Reporter
- Bio : Libero iure laudantium cum maxime quasi iusto ullam minus. Culpa in ut voluptas omnis dolor nesciunt quae aut.
Socials
facebook:
- url : https://facebook.com/jasta
- username : jasta
- bio : Optio sint atque et quibusdam laborum repellat nihil.
- followers : 3509
- following : 2390
twitter:
- url : https://twitter.com/archibald5497
- username : archibald5497
- bio : Delectus reprehenderit nemo dolorem. Quos voluptatum suscipit dolorum cumque veniam repellendus dignissimos asperiores.
- followers : 4359
- following : 2850
tiktok:
- url : https://tiktok.com/@archibald_id
- username : archibald_id
- bio : In molestias officia modi nihil repellat.
- followers : 4936
- following : 2518
instagram:
- url : https://instagram.com/jasta
- username : jasta
- bio : Qui eos dolor quaerat dolorum quia non temporibus nihil. Qui mollitia harum eos aut.
- followers : 3492
- following : 700
linkedin:
- url : https://linkedin.com/in/archibald_jast
- username : archibald_jast
- bio : Nulla eaque perspiciatis perferendis.
- followers : 1301
- following : 2195
